Showing posts with label bathroom. Show all posts

Tuesday, November 18, 2014

Painting the ceiling

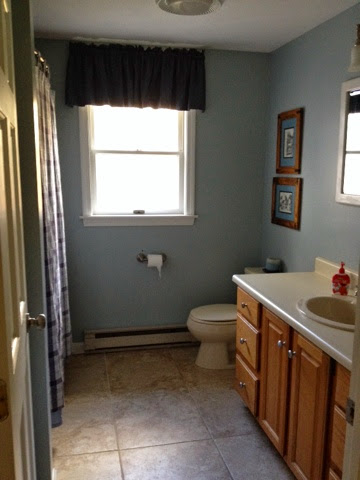
I finally got around to painting my first ceiling. I wasn't prepared for what a workout that was. I was literally shaking at the end from reaching up and contorting my body to roll this way and that. 

As I started cutting in I realized that our ceilings weren't white. So there goes any idea of spot painting in other rooms. At the end I don't think anyone would notice my efforts but since the bathroom was my first paint job I was happy to recut the ceilings and hide the horrible cut job I had done with the few splotches of blue on the ceilings where I hit the ceiling with my paint brush. Wow have I come a long way in 2 years. 


So now all we have left to do in here is get a new countertop and we will have actually completed our first room!

Monday, July 28, 2014

Bathroom facelift

A while ago I posted about painting our master bathroom yellow and the dramatic change it made for us. To remind you, here is a picture of what we started with when we moved in. Not awful, but nothing nice. A few things you can't see are the metallic linoleum, the oak and gold light, oak and gold towel bars and toilet paper holder, and the non-flushing, corroded toilet.


For me to use this bathroom at all, we decided early on to get somewhere to put our towels, upgrade the hardware, and paint. The paint cost us $12 for two samples of Sherwin Williams Banana Cream, the shelves were $20 each, from target. Our hardware on the vanity I took off a desk I had refinished years ago and we were getting rid of. The toilet paper roll and towel bar were free from my parents left over. We did have to buy 1 18 inch towel bar to match and that was $31 from doorcorner.com. We went with Dynasty hardware's Sonoma collection in brushed nickel. I would definitely recommend this over what you can get at Home Depot or Lowes.


The light switch plate was $10. The curtain we had from our old house and matched the shelves perfectly. This took the bathroom from my least favorite place in the house to a room I liked a lot. It was bright, more modern, and felt more of our style. We planned on this getting us by for years and we were both okay with that.

This past week I decided to take the bathroom reno one step further and paint the mirror/medicine cabinet and stain the vanity. We hadn't talked about further changing the bathroom or had any plans off doing anything. I was brushing my teeth looking into our oak and gold medicine cabinet and realized that if I were already going to be using primer and white paint (deck painting), I might as well just touch this up. Once I painted that, I realized it wouldn't be too hard to fix the vanity also.

I looked at a few blogs to do the vanity, but wish I had just gone straight here: http://www.monicawantsit.com/2012/02/staining-oak-cabinets-espresso-color.html

The reason, was that the other blogs did not specify that you DO NOT WIPE the stain, you let it sit. After much anxiety about it not coming out how I wanted, once I read this, it was a game changer. Here is what I started with and what I end up with.


One coat:


Because I wiped the stain, 2 coats got me this streaky mess:


3 coats looked about the same giving me a very depressed feeling. Then I read to not wipe and got this:


Gorgeous!! Honestly, I was so proud and excited at how this came out. I was happy to have these two new changes get us through more years in this bathroom. But, seeing how excited I was about the vanity my husband surprised me for our anniversary with a new counter and light. Which turned into a new faucet, counter, light and toilet!!! It was obvious with the new counter we couldn't put our gold chipped faucet back on, then once we were that far, I just said forget it, lets do the toilet and call this project done (minus floors and shower door).

Yay! Full bathroom reno!!! I keep reading how the return on bathroom work is high and I think we nailed it with this. Either way, we love it and that is all that matters!!!

Ta da!!


This project wasn't without its headaches and I will post on the troubles installing the new sink/counter/etc :)

Friday, July 26, 2013

First officially completed project... well mostly?

So it is official, we have new floors in the kids bathroom. After the mold incident, we decided that it was priority #1 to get some waterproof flooring in that bathroom.


Now, if we look at our list for what was needed in this bathroom....

Take off shower door
Shower curtain bar and curtain
Flooring
Paint
Paint ceiling
New vanity light
New Faucet
Towel bars
Toilet paper bar
Hook on door for towels
More shelving in closet
New vanity countertop (?)
New mirror - Painted mirror white

Let me add a few things:
New toilet
New handles for shower
Paint hall door 

Even with the new adds, I would say based on our original ideas of what needed to be done to transform this bathroom from this:


To this:


Its looking good. The shower handles are hidden by the shower curtain. The toilet works and has no visible issues. I WILL get to the last door and paint it by the end of the summer. But, I guess it goes to show you, is anything really done?

Wednesday, June 19, 2013

When the house picks your projects

In renovating an older home sometimes the house chooses the next project in line.

After a few weeks of reprieve on indoor improvements, the hubs and I started plotting our next indoor projects. We've spent the majority of the spring and any small scraps of $ and energy (free time) we have on the landscaping. I will get pictures up soon.

One thing that has become apparent in the few really muggy hot days we've had is that our house smells. We've worked hard to find the source, but my best guess is 30 year old carpets that sat with dust have embedded their musty scent all over. I always figured some paint and many vacuums later we'd be all set. Nope.

So, our plan is to focus next on floors. My husbands #1- the kitchen. Our beautiful plywood floors are wearing out their welcome. Especially since we have messy boys and no real way to clean them. 

Which brings me to the original topic - the house said no, it wants bathroom floors.

An unfortunate pee incident next to the tub led me to discover a whole lot of mold. Guess we'll be searching for a money tree and tiling the bathroom as our next project.

Monday, April 1, 2013

Painting trim

Oh my Lord, I did not realize the gravity of this project. It's funny, its not something you really think twice about and yet, since we've moved into this house, it has definitely been one of those things that stick out to me.

Our house has 0 trim painted. The whole entire house has natural colored oak trim. Which was lovely to match the natural colored oak furniture that was in every room. At first, the nature lover in me decided it wasn't that bad. Now, 6 months later I could really care to see another oak colored surface. We moved out the majority of the oak furniture, but the trim and windows and vanities...

It started to become very obvious I wasn't into the trim when I began painting the house. The bright colors weren't popping like I would like next to the light brown oak. I thought for a while I just picked back colors. But, the reality is a pale blue contrasting with a light oak is much different then next to white.

So, I became determined to at least eliminate some of the natural trim in the house. That's when I learned painting trim SUCKS!!

Like this gem of a spot, how the hell do you paint the side of this? Literally a 1 inch (at most) gap from trim to corner of the wall. 


I also learned why they say to paint the trim 1st before the walls. Ace hardware painters tape took the drywall right off. This is everywhere, the window, the door. I was able to paint over it in blue, but upon close inspection you can see it.

After a lot of hell sanding I finally got all the trim and baseboard done. I still need the courage to do the doors. I figure I'll wait until summer, take them off and sand, prime, and paint in the garage.


Do you see the difference the white makes though? Now of course, I want to do my bedroom, and the downstairs bathroom.. oh and every other room in the house. But, since this amount of trim took 2 weeks of begging for time off of the kids to do and it only resulted in this much getting done, haha. The rest of the house will be done in, oh, 5 years :)

Friday, February 8, 2013

Sometimes you need to hire a professional

Although we have high hopes for completing this DIY reno ourselves, there are times when you need to put pride aside and just go for a pro.

After weeks of our bathroom lights just sitting there and lots of debate the best way to hang them, it was time to get an electrician in there to do it. We finally figured out the wiring, but found that there is no stud to hang the lights on. We also discovered both lights need a can in the wall and one of our lights is actually a ceiling mount light.

In reading on HGTV's website, one the biggest cost and time savers is to just hire a pro for certain things. Instead of doing it wrong and spending more time and money in the long run!

Downstairs bathroom


It took a weekend, but I got the downstairs bathroom painted. Added a new towel bar. Threw a rug down, hung a mirror, new vanity light, and BOOM - much better.

The original:


The updated:


This is has so far been the least time consuming project. It literally took a couple hours to paint, a couple more for touch ups, hanging artwork, etc.  Oh and the electrician for the light. But, I think the transformation was great! I used the same color as the basement "playroom", Sherwin Williams Dromedary Camel. We still have a new counter top (that is in the garage) for the vanity. I'd like to paint the vanity brown and add hardware, but for now, totally content.

I apologize for the lighting. There is no windows in here, so this was the best that I could do. 

Saturday, January 5, 2013

Kids Bathroom

It may seem like an odd place to start, but it seemed like starting small was the way to go. A project we could complete in a short amount of time so we could feel like we could be successful. It actually started a little out of necessity as well. We have two kids that bathe every night and this is their bathroom. The tub had the most God awful '80's doors on it, gold with a frosted sunset (Here's where I admit that I never actually got a picture of it before we took it down). The door was not only ugly but it wasn't functional for bathing kids, so off it went and already the bathroom looked better. Well, if you ignored the big brown stain behind the toilet. The metallic linoleum floors and the chipped gold faucet.

Here's what we were working with:


You can slightly see the door in the top picture. And do look closely at the faucet. I didn't get a picture of the light fixture while in, but here it is after I took it down. Oak, gold, tulip glass.


Step 1: Remove the tub door, fill in the holes left, and caulk the whole tub. Free, mostly. I think the glue and the caulk were about $10 total.

Lucky for me, my Mom brought me 4 cans of blue paint in 3 colors. She knew I wanted to do the bathroom blue and also my oldest son's room in blue. I decided on California paint Yarmouth Blue for the bathroom. I decided on the color based on the shower curtain we already had, which later I realized was a bit silly, but it worked out since we got the free paint.

A little background info, I have never painted a room. When I think about it, I'm a little shocked that I haven't. I painted a wall at our rental property, but never a room, so this was my first experience. I started off late at night when the kids went to bed and I chose to tackle two small walls. I taped the trim, cut in the ceiling and the edges and rolled the two walls. I eventually was able to tackle the whole bathroom and I definitely needed a second coat. The entire bathroom probably took me 8-10 hours to paint 2 coats.

Next task, pick out new towel bars, toilet paper roll, vanity light, faucet, and hardware. My mom helped us a bit and for my birthday gave us a vanity light and a faucet. I ended up returning them both because I wanted 4 lights vs. 3 and the faucet was all together and our sink is a split. I had bought a Tub curtain rod at Target and picked a great brushed nickel rounded bar. So in matching the faucet, towel bars, etc I learned my first major lesson: Brushed Nickel is the most expensive.

We chose to go with one 18" towel bar, the toilet paper bar, a towel/robe hook for the door, Delta Nuva faucet, and a 4 light vanity. The bars and hook were easy to install - anyone can do this. The faucet was a different story.

The faucet took my husband about 7-8 hours to install. He hit a few snags because the piping was not made for modern faucets. My husband got crafty and installed a hose from the drain to the pipes instead of cutting the drain (which we have no experience doing). I would say that the faucet install did not seem like a project that I could have done, so although I was a little surprised by the time it took to install, I'm happy I didn't have to do it. In the end, just changing the faucet, changed the room for me. Even my son walked in and was so excited, look at my new sink!!


The light. This is where we ran into another snag. As you can see from the picture, for some reason, they put the electrical wire to the right, so for us to install our light we would have to move the wire quite a bit. To do this we had to extend the wire. More to this in our post on: Hiring a professional. Which basically meant that we also had a huge hole to fix, but done!


The vanity hardware worked out for us. We were selling an old dresser that I had refinished years ago, so I swapped out what was in the bathroom with the brushed nickel knobs from the dresser.


Last order of business, FLOORS!!!! New window, trim, and since the mirror was hanging out in the hallway for so long (and my kids took a screw driver to draw on it) a new mirror. Guess that's the beauty of a big renovation with two crazy monkey's bouncing around just hoping you leave a tool. 

COST BREAKDOWN:

Vanity Light – Peerless 4 light $79.00 - $58.00 (Returned one mom bought)
Towel bar – $23 something, but apparently they forgot to charge us
Toilet paper bar – $18.48 - $1.85 (coupon)
Shower curtain rod - $35
Shower curtain – Free (already had it)
Paint – Yarmouth Blue – Free (from MOM), we used about 1/2 a gallon so I'd guess around $25.
Faucet – Delta Nura $129.00 - $12.90 (coupon) – $59.00 (Returned one mom bought) - $50.00 (gift certificate)
Caulk - $4.97 - $.50 (coupon)
Robe/ towel door hook - $3.97 - $.40 (coupon)
New Knobs – Free, already had them from a dresser
Curtain – Free, already had it
Spackle – Free, already had it
Extra wires for light - $8.49
Hoses for faucet - $14.00

Electrician???

Thursday, November 29, 2012

Sweat Equity


Photo credit: http://stayviolation.typepad.com/chucknewton/2008/01/sweat-equity-sw.html


Ever watched the show sweat equity on tv? We used to watch it religiously before we bought our first home. We always thought our first house was going to be a "fixer upper", turns out it was turn and key. But, with the purchase of our first home (vs. townhouse) we are ready to put some sweat and labor into our place and hoping to increase our value and in this economy, refinance and drop our payment.

We knew when we moved it that paint was the quickest way for us to improve what we had. The cream walls in the whole house was great, since it was a clean slate, but they make it feel cold and unfinished.

Right when we moved in, we could see our other important order of business was to update the bathrooms from their gold fixtures and oak towel bars and light fixtures.

Our other bonus came in a bit of accident. Before we decided to buy, we were steps away from building. Back a few months ago as I was leaving our storage unit I noticed a sign for a display sale at a kitchen design center. I went on the website and they had two beautiful kitchens. Thinking we were building and that we'd need to order a kitchen anyway, I thought this might be a good investment. I grabbed my Mom, who is much more knowledgeable about these things, we met the owner and ended up with both kitchens! Figuring to put one as a kitchen and the other we would split up for vanities and built ins. We moved both kitchens into storage and when we bought the house - into our garage.


In honesty, I feel like this was meant to happen, because I really don't like the kitchen we have. The cabinets are in great shape and could be refinished, but they are small. The kitchen itself is small and we have a lot of stuff. So, our next order of business would be the kitchen.

When we first decided it was time to upgrade from the townhouse our major need was land. We have a big dog and a growing family and we need space. I also am an avid gardener. I have always wanted a vegetable garden of my own and my own beautiful landscaped playground. I have spent years landscaping my parents yard and have wanted one of my own to transform. I was a landscaper in the summers all through college and I love the joys of being outside, the hard labor, and the rewards from gardening. It also helps that we have a landscaping company 3 doors down and our neighbor is awesome. The first week we moved in, the owner came over and asked us for a favor. He needs to use our driveway for the next few months to access the next door neighbors back yard to deliver fill. I, of course, said yes and started the back scratching.


He let us borrow his landscaping blowers to remove the years of leaves that filled our 3 acres. Then he came with a tractor and hauled at least 10 loads of leaves out of the yard. He and I also talked about improving the lawn and he is going to help me put in a brick walk way in the front! Landscaping!!!

So, where am I going with this?? Well, it just happens that I look at sweat equity and see the 5 top projects to improve the value of your home....


Yay! We are on the right track!